1. Log In
Sign in to the CE App by clicking here.

- Enter your details to login.
- Login Credentials: your credentials will be the same as those you use to sign in to the ALTA members-only page.
- Note: We recommend bookmarking this ALTA sign in page in your browser for easy reference.
2. Continuing Education Dashboard
Please reference the ALTA CE Policies & Procedures for more details on your requirements

The dashboard will be the first screen that you will see once you sign in and will provide you with a summary of the completed continuing education records.
- The default Filter is “This Cycle Only” which includes credits from your current ALTA renewal period. You can click on that blue box to see results from a different time range.There is a count of Credits Completed on the top within the time period filterThe CE Title column shows the name of the continuing education activity and the date you completed itThe Credits column shows the hours completedSponsoring Org is the educational organization that provided the activity/course. This will be blank if the Activity Type is a Reflection Form
- The “+ Record New CE” button will take you to record a new CE
- The View button will enable you to see your entry and certificate that you’ve already added
- Carry Forward Credits from Previous Cycle includes the extra credits you completed in the last cycle that carries into the current ALTA renewal period.
- Typically this means if you completed more than 10 credits in the previous calendar year, you would see those extra credits carried forward here.
Note: If you are looking for CE Records before 2021, please email [email protected].
3. Profile Management
When you sign into your account, you should see an icon in the top right corner. Click on this icon, and you will find an option for ‘Profile Management’. Select this option, and you’ll be on your profile.

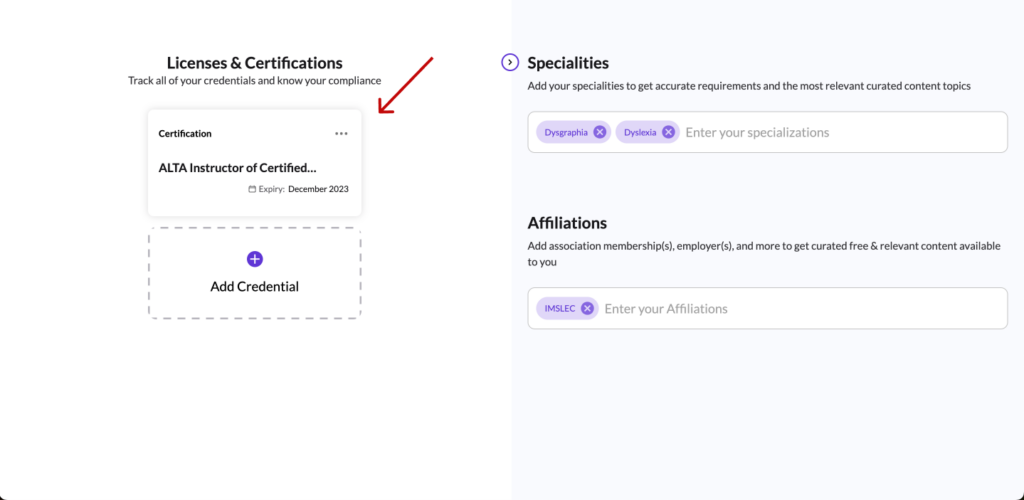
Here, you will see the user’s profile information. You should look for the ‘Licenses & Certifications’ section.
a. Add a License or Credential
To add a license or credential, follow these steps:
- State or Issuing Body: Enter the state (e.g., California) or the issuing body (e.g., ABIM).
- Credential Type: Specify the type of credential (e.g., MD or DO).
- Credential Number: Input the credential number.
- Original Issue Date: Enter the date the credential was originally issued.
- Expiration Date: Provide the expiration date of the credential.
- Verification URL: Add the URL for verifying the credential.
- Add Credential: Click the “Add Credential” button to finalize and save the entry.
Then, simply click the “Add Credential” button. You can use this section to also track other types of credentials and not just licenses.


b. Update the License
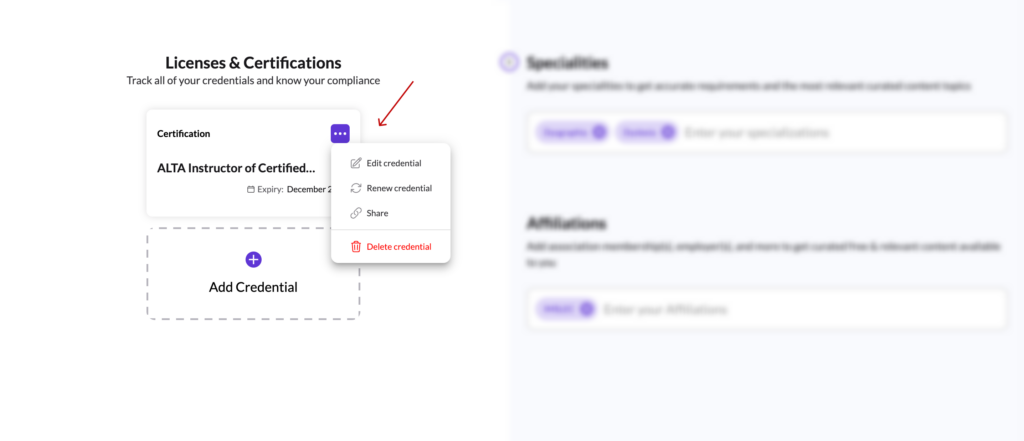
- To select options, click on the three dots on the credential card.
- To renew a credential or edit the due date, select the appropriate option from the menu that appears.
- To edit details or upload attachments, choose the edit option (indicated by the pencil icon) from the menu.
- To delete an old or updated credential, choose the delete option from the menu.


